Constructing a customized bike half from uncooked supplies takes endurance, planning, and a focus to element. The method usually begins with easy design work, testing concepts on cardboard earlier than transferring to stronger supplies. From there, patterns are refined, measurements are marked, and the metallic is formed step-by-step till the specified type begins to take form.
Workshop setup additionally performs a key function. Utilizing cell tools, choosing the proper thickness of metal, and counting on each hand instruments and machines assist preserve the work environment friendly and exact. Every stage, from forming the wire body to ending the seat base, provides as much as a challenge that’s each practical and well-crafted.
Key Takeaways
- Cautious design and planning information every step of the construct
- The precise instruments and supplies enhance accuracy and effectivity
- Small changes throughout shaping result in a greater last end result
Designing the Cafe Racer Cowl
Utilizing Cardboard Mockups
He started the method by shaping the design with cardboard. This step allowed him to check totally different outlines earlier than committing to metallic. A number of variations had been usually made till one appeared proper.
Advantages of cardboard mockups:
- Fast to chop and alter
- Low value earlier than transferring to metal
- Helps visualize proportions on the bike
| Materials | Function |
|---|---|
| Cardboard | Check design shapes |
| Paper | Mark shrink factors |
| Metal rod | Construct wire buck for symmetry |
Pause and Replicate Method
He usually relied on what he known as the pause and mirror methodology. This meant sitting again, trying on the work, and considering by means of adjustments earlier than transferring ahead.
This step was much less about instruments and extra about endurance. By taking time to review the form, he may spot uneven areas or design flaws early.
Key factors of this methodology:
- Step away from the challenge to reset perspective
- Search for symmetry and stability
- Keep away from speeding into the following stage
Materials and Software Selections

Choosing Sheet Metal
He labored with cold-rolled mild steel in several gauges to form the cowl. At first, he used 18 gauge (1.1 mm), which proved too heavy for the challenge. He then switched to 20 gauge (0.95 mm), discovering it sturdy sufficient whereas simpler to type.
| Gauge | Thickness | Notes |
|---|---|---|
| 18 | 1.1 mm | Very sturdy, however heavy and more durable to form |
| 20 | 0.95 mm | Lighter, simpler to work, nonetheless sturdy |
He lower templates from paper to information the place shrinking was wanted, then transferred these marks onto the metal earlier than shaping.
Warmth-Fashioned Plastic for Seat Pans
For the seat base, he used a thermoplastic sheet that softens with warmth and shapes on to the bike body. As soon as cooled, it turns into inflexible and might be lower and sanded like wooden.
- Benefits:
- Conforms completely to the bike
- Straightforward to chop, sand, and end
- May be paired with seat clips for an expert match
This selection simplified the method of creating a exact and sturdy seat basis.
Key Instruments for Shaping Steel
He relied on a mixture of powered and hand instruments to type the sheet metallic.
Fundamental instruments:
- Nylon hammer
- Sandbag
- Middle punch for marking reference factors
Shaping and ending instruments:
- Energy hammer with retractable wheels for mobility
- Shrinker-stretcher for adjusting edges
- Bead curler to spherical seatpan edges
- English wheel or planishing hammer for smoothing
For these beginning out, a shrinking stump, nylon hammer, and sandbag can deal with a lot of the work with out superior machines. Even easy hand planishing towards a dolly or mounted floor can obtain clear outcomes with sufficient effort and time.
Forming the Wire Body
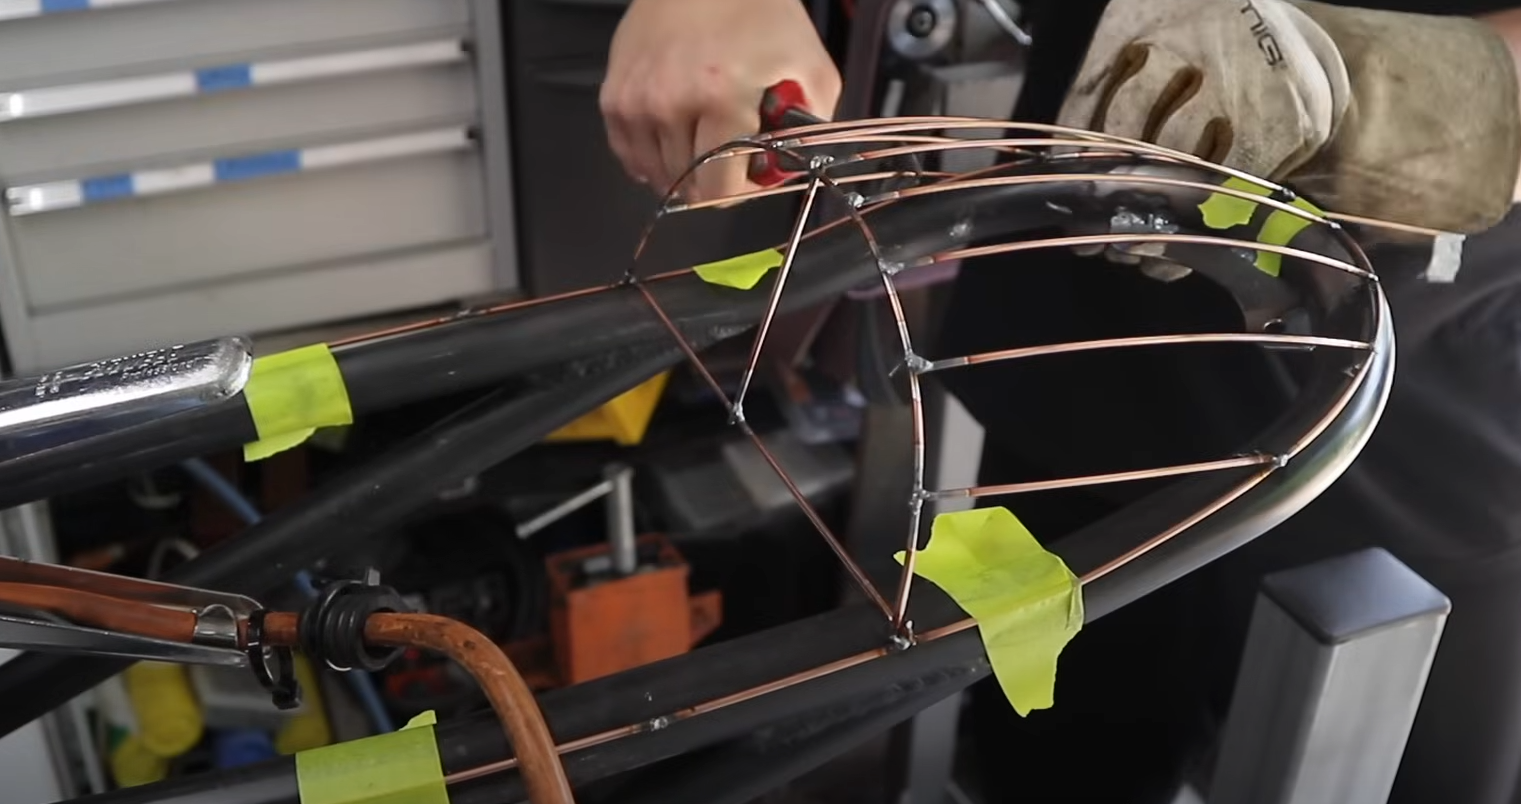
Working with Metal Rods
He formed the body utilizing 2.4 mm metal rods usually used for TIG welding. These rods labored properly as a result of they had been straightforward to chop, bend, and alter. As every bit was added, the body confirmed the place the curves lined up evenly, which made it simpler to identify areas that wanted correction.
Key factors:
- Materials: 2.4 mm TIG filler rod
- Function: varieties the bottom form of the hump
- Profit: straightforward to chop, bend, and alter for accuracy
Protecting Each Sides Even
He targeted on ensuring each side matched by checking the form as he constructed it. The wire body helped reveal any excessive or low spots, which he may then alter till the curves appeared balanced. This step ensured that the ultimate metallic piece would sit evenly as soon as it was shaped.
Easy checks for stability:
- Evaluate left and proper curves usually.
- Alter rods till each side match.
- Use the body as a information earlier than transferring on to paper templates.
Transferring Patterns and Setting Reference Marks
Utilizing Paper Patterns
After shaping the wire body, he moved on to paper to map out the design. The paper helped determine the place the metallic would want shrinking. He folded the paper wherever the floor would pull in, creating clear guides for later shaping.
To maintain monitor of those changes, he outlined the areas instantly on the paper. This step ensured that after the metal was lower, the shrinking course of may observe the identical mapped factors.
Key steps he adopted:
- Hint the wire body onto paper
- Fold paper at shrinking factors
- Mark areas that want shaping earlier than slicing metal
Marking with a Punch Software
Since marker traces can fade throughout shaping, he used a punch to create small, everlasting dots within the metal. These marks acted as reference factors that stayed seen by means of hammering and forming.
This methodology allowed him to return to the precise spots that wanted consideration, even after a number of rounds of shaping. It additionally gave consistency when evaluating each side of the piece.
| Software | Function |
|---|---|
| Marker | Fast structure, momentary information |
| Punch | Everlasting reference marks |
By combining each marking strategies, he saved the method correct and prevented shedding monitor of the important thing shrinking factors.
Steel Shaping Methods
Lowering and Increasing Steel
He marked the sheet with small punch marks to trace the place the metal wanted shrinking. By controlling these areas, he may pull the metallic in and create the curves wanted for the cowl. When the metallic stretched too far, he switched to a stretcher tool to carry it again into form.
Instruments used:
- Shrinker/Stretcher
- Middle punch for reference factors
- Marker for structure
Working with a Energy Hammer
The power hammer sped up the shaping course of by rapidly shrinking and forming the metal. He mounted the machine on retractable wheels so it may transfer across the workshop however keep steady throughout use. A couple of minutes of hammering gave the piece its tough form, which he then refined with hand tools.
Benefits:
Hand Ending Methods
He confirmed that shaping may be carried out by hand with easy instruments like a nylon hammer, sandbag, or perhaps a dolly. By placing towards a stable floor, he flattened and smoothed out excessive spots. Though slower than machines, this methodology nonetheless produced correct outcomes.
Fundamental hand instruments:
- Nylon hammer
- Sandbag
- Dolly or stable floor
Utilizing an English Wheel
For last smoothing, he turned to the English wheel. This software eliminated small imperfections and gave the metallic a clear, even floor. Smaller wheels labored finest for bike elements, and he famous they had been inexpensive for anybody eager to do extra initiatives.
Key advantages:
- Smooths out hammer marks
- Creates even curves
- Works properly for ending skinny sheet metallic
Workshop Effectivity and Mobility
Wheel Upgrades and Retractable Design
He positioned practically each machine in his workshop on wheels to make transferring tools simpler. The hydraulic elevate desk obtained upgraded casters, which improved dealing with and stability. The ability hammer additionally sits on a wheeled base, however with a retractable system so it stays regular throughout use and might nonetheless be rolled out of the way in which when wanted.
Machines on Wheels:
- Hydraulic elevate desk (with upgraded wheels)
- Energy hammer (with retractable setup)
- Most different workshop tools, besides the metallic lathe
This setup permits him to regulate the structure rapidly, creating more room when required. The retractable design prevents heavy tools from shifting whereas in operation.
Software Storage and Setup
Protecting instruments organized helps him work sooner and keep away from wasted time. He usually depends on easy storage options that preserve hammers, markers, and shaping instruments inside attain.
Generally Used Instruments:
| Software | Function |
|---|---|
| Nylon hammer | Shaping and stretching metallic |
| Sandbag | Backing for hammer work |
| Shrinker/Stretcher | Adjusting seat base fitment |
| Bead curler | Rounding and strengthening edges |
By arranging the workshop with mobility and group in thoughts, he maintains a clear, adaptable area that helps each small changes and bigger fabrication initiatives.
Seat Base Fabrication
Marking the Body Middle
He situated the center of the bike subframe to make sure the seat base would sit evenly. This step gave him a transparent reference level, which helped preserve the general match correct. With out this, the seat may shift to at least one aspect or sit erratically.
Rolling the Seatpan Edges
He used a bead curler to curve the perimeters of the seatpan. This step helped the panel match extra snugly towards the bike. Nonetheless, rolling the perimeters additionally prompted the panel to flatten barely, which required additional adjustment.
Instruments Used:
- Bead curler
- Minimize metal seatpan
Adjusting with Shrinker and Stretcher
He corrected the flattened areas by working with a shrinker and stretcher. When the changes went too far in a single route, he swapped the tooling to stretch the panel again into place. This back-and-forth course of allowed him to refine the form till the seatpan matched the body.
Adjustment Course of:
- Shrink edges the place wanted
- Stretch areas that pulled in too far
- Repeat till alignment matched the body
Remaining Construct and Ending Particulars
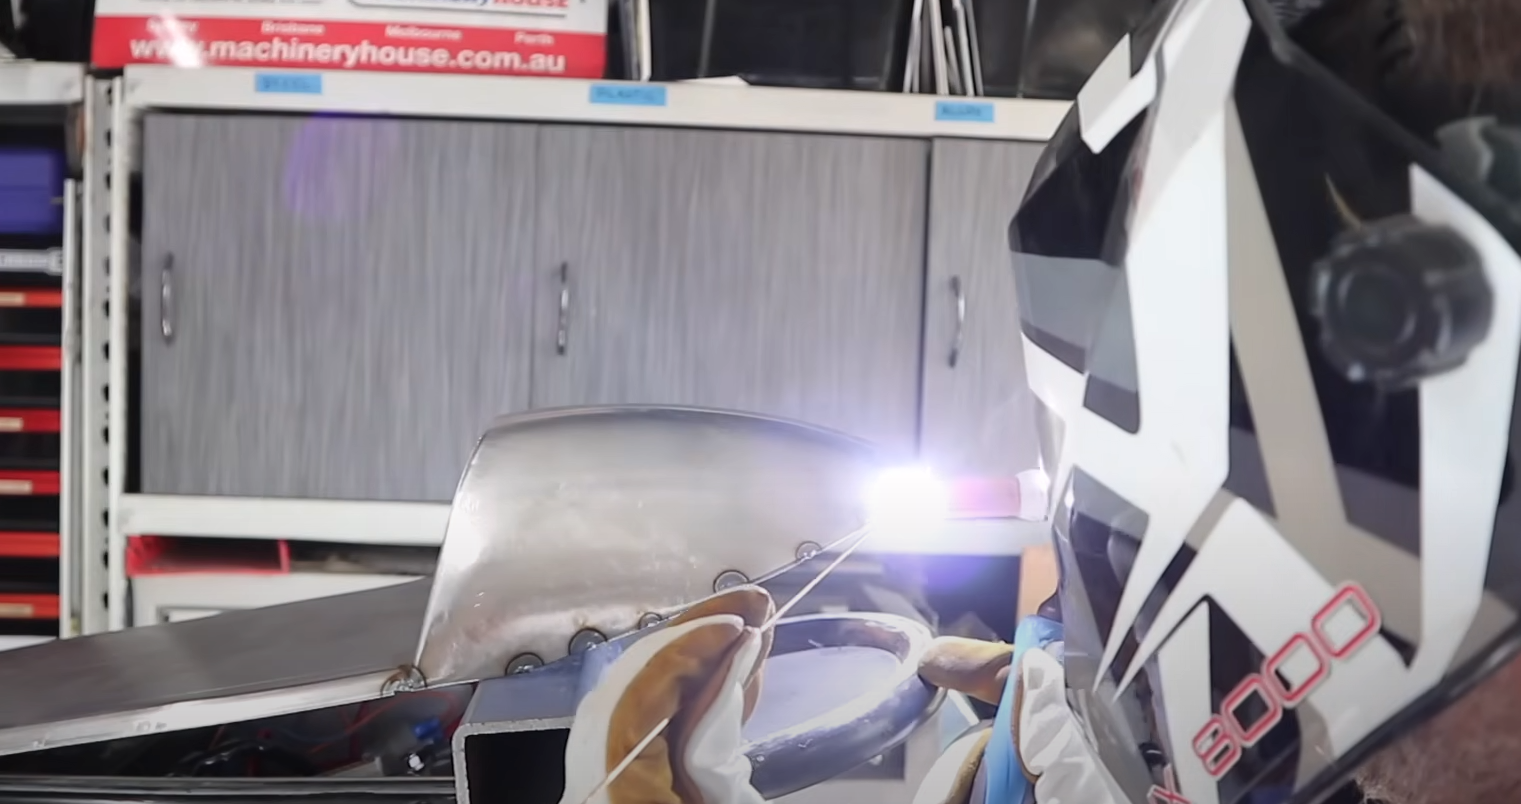
Strengthening the Entrance Lip
He tipped the entrance fringe of the seat base earlier than attaching the hump. This step added further power to the panel and in addition gave it a cleaner, extra skilled look. By folding the sting barely, the piece held its form higher and resisted flexing.
Becoming a member of the Hump to the Seat Base
With the entrance edge ready, he welded the hump instantly onto the seatpan. Cautious alignment made positive the 2 elements sat flush towards one another. Small changes with instruments just like the shrinker-stretcher helped right any distortion earlier than welding.
Clear Match and Skilled End
The ultimate meeting got here along with a exact match. The sides lined up easily, and the welds blended into the floor. The end result was a stable construction with a refined appearance, giving the challenge a end that appeared factory-made. He even started shaping matching aspect panels to hold the identical degree of element throughout the construct.
Encouragement for Steel Shaping Lovers
Benefits of Working with Steel
Steel shaping permits creators to show flat sheets into custom forms with precision. It offers them management over symmetry, curves, and particulars that make every bit distinctive. The method can really feel rewarding as a result of it combines design, problem-solving, and hands-on talent.
Many discover the work satisfying as a result of it develops endurance and a focus to element. Even small changes, like shrinking or stretching metal, present progress in actual time. This makes the craft each sensible and motivating.
Starter Instruments Price Contemplating
Novices don’t want costly machines to start out shaping metallic. A number of easy instruments can go a great distance:
| Software | Function | Notes |
|---|---|---|
| Nylon hammer | Varieties and smooths metallic | Light on metal, helps management shaping |
| Sandbag | Helps hammering | Used for shrinking and stretching |
| Shrinking stump | Shapes curves | A wood block with a bowl lower into it |
| Dolly or vise setup | Hand planishing | Flattens and refines surfaces |
Non-compulsory instruments like a small English wheel or a hand planishing hammer can pace up ending work. Nonetheless, even with out them, cautious use of primary instruments can produce sturdy, correct outcomes.
By beginning easy and including instruments over time, fans can construct talent and confidence with out feeling overwhelmed.
Trending Merchandise