Taking up the restoration of a 1986 BMW K100, the builder dove into the venture proper after ending one other bike. The bike was found not working and got here with loads of challenges, from main wiring points to key elements that wanted changing. Early steps included diagnosing its issues, stripping it to a rolling chassis, and coping with surprising wiring issues, a few of which resulted from additional equipment put in by a earlier proprietor.
All through the method, the builder discovered about engaged on water-cooled engines, used artistic methods to maintain monitor of spare elements, and sought assist with expert welding for the body. Cleansing and restoring every bit turned an essential routine, as did saving each half till the construct was full. This journey concerned problem-solving, studying new strategies, and adapting as surprising conditions got here up.
Key Takeaways
- Efficiently buying and diagnosing a non-running BMW K100 offered distinctive challenges.
- Cautious disassembly, wiring administration, and thorough cleansing had been essential steps.
- Collaboration and inventive options performed an essential function within the restoration process.
Getting the 1986 BMW K100
Trying to find the BMW K100
He discovered the 1986 BMW K100 whereas shopping on-line listings, quickly after wrapping up a earlier bike venture. The bike confirmed up on Fb Market and drew his consideration though it wasn’t working. He observed straight away it got here with extra parts—a plus when working with an older machine.
Selecting to Purchase
After recognizing the submit, he despatched a message to the vendor with a suggestion for the bike. The proprietor accepted it, making the selection simpler. His associate was supportive of getting the K100, particularly when he described it as a very good venture to work on together with his oldest son.
- Worth: Modest supply accepted
- Situation: Didn’t run
- Assist: Associate agreed, noticed worth within the venture
Plans and Intentions
The primary thought was to repair up the K100 and resell it for a revenue. He additionally appreciated the concept of getting a fuel-injected bike to work on, one thing completely different from his final construct. The venture turned a strategy to study, collaborate together with his son, and switch an unused bike into one thing particular.
| Activity | Objective |
|---|---|
| Repair mechanicals | Make bike run and rideable |
| Strip elements | Prep for customized rebuild |
| Clear plan | Construct and presumably promote |
Early Drawback-Fixing and Fixes

Swapping Out the Gasoline System and Ignition Elements
The bike was purchased in non-running situation, so one of many first steps was to determine why it wouldn’t begin. After checking issues over, it was clear that two essential elements wanted to get replaced: the fuel pump and the ignition coil packs. These are frequent bother spots on these bikes.
- Gasoline Pump Points:
The gas pump on this bike sits contained in the gasoline tank, which regularly causes issues if it will get clogged or the rubber boot breaks down. Fortunately, additional elements had been included with the bike, making the job simpler. - Coil Pack Alternative:
New coil packs had been put in as a result of the outdated ones failed. This was essential to get good spark and ensure the engine would run correctly.
| Half | Drawback | Answer |
|---|---|---|
| Gasoline Pump | Clogged and breaking up | Changed with spare |
| Coil Packs | Failed (no spark) | Put in new ones |
Coping with Wiring and Customized Additions
Dealing with the bike’s wiring turned out to be more difficult than anticipated. The earlier proprietor had added issues like heated grips and a stereo. This made the wires cluttered and laborious to handle.
- Further wires from the customized options had been eliminated to make the bike less complicated and simpler to work on.
- He observed that the wires to the gas injectors appeared burned and so they even caught hearth at one level, which made issues riskier.
- The quantity of wiring on this mannequin was overwhelming at first. It was powerful to maintain monitor of which wires had been essential and which may very well be deleted.
- Not all adjustments had been excellent—deleting the heated grips was later regretted, particularly as driving in colder climate turned uncomfortable.
Ideas for Others:
- At all times save each half till the venture is completed.
- Preserve sufficient wire size when making cuts to make repairs simpler later.
- Think about using 3D-printed covers to guard engine elements throughout cleansing.
Breaking It Right down to the Naked Body
Eradicating Elements and {Hardware}
The venture started by taking off all the extras from the bike, reminiscent of covers, fairings, unneeded wiring, and added equipment just like the stereo and heated grips. Each bolt, bracket, and small half was saved in organized containers to keep away from dropping something essential. The brakes had been disconnected. The method additionally meant pulling out the built-in options that the earlier proprietor had put in.
A easy desk for organizing eliminated elements:
| Half | The place Saved | Notes |
|---|---|---|
| Fairings | Bin A | Verify for body mounts |
| Wiring & Cables | Bag B | Label connectors |
| Stereo/Equipment | Field C | Discard or repurpose |
| Bolts/Fasteners | Tray D | Don’t toss small {hardware} |
Tip: Preserve all unique elements till the construct is completed. Typically, old fairings or items have mounting factors or bolts that shall be wanted later.
A variety of time went into cleansing each part after every half was eliminated. Sticky grime, rust, and leftover fluids had constructed up through the years. The purpose was to finish up with a clear, simple base to begin the precise construct.
Planning the Traditional Look
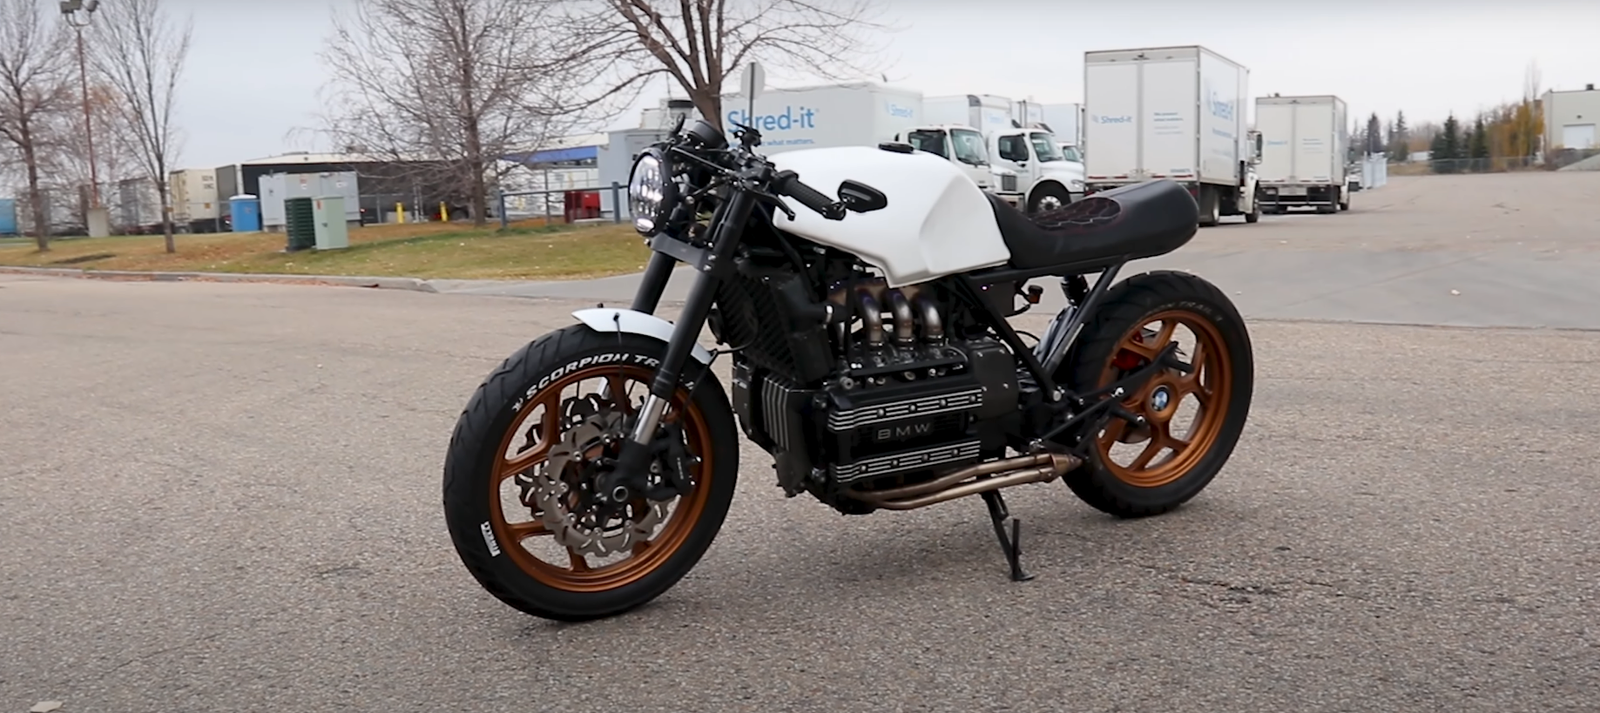
With all of the pointless items gone, consideration turned to the bike’s fundamental strains. The bike was rolled out in its easiest type, simply the body, wheels, tank, and core mechanicals—a really perfect setup to see the beginning geometry and measurement.
This stage made it simple to image what the finished project would appear like as a café racer. Standing again and looking out on the plain construction helped in making choices in regards to the stance, tank place, and what wanted to be welded or modified.
They used this section to identify what may very well be additional eliminated, what wanted to be mounted, and what particulars would form the ultimate model. Cleaners and short-term covers (some elements had been 3D printed to maintain particles out) protected the engine whereas concepts fashioned for the subsequent steps.
Electrical Wiring Ideas
Adjusting and Increasing the Wiring
Working with the wiring on this bike got here with a whole lot of challenges. The unique setup had additional options like heated grips and even a stereo, which made the wiring cumbersome and complicated. These additions created an online of wires that wanted consideration. Eradicating the elements that weren’t wanted, such because the heated grips and stereo, helped to simplify issues.
Throughout the course of, it was essential to watch out when reducing any wires, particularly across the connectors. Errors right here may cause greater issues later. One useful tip is to go away additional size on any wires which might be minimize. This fashion, if a connection must be remade, there may be sufficient wire left to work with.
Key Takeaways from Previous Electrical Work
There have been many classes that got here from engaged on the bike’s wiring. For instance:
- Save all eliminated elements till the construct is completed. Typically, elements like mounting brackets or bolts are wanted once more for different sections of the bike.
- Don’t rush when working with electrical techniques. Taking issues gradual helps keep away from costly mistakes.
- It’s simple to underestimate the wiring on a motorbike like this, particularly with additional options from previous house owners. Cautious planning makes a giant distinction.
- Instruments like a 3D printer may be useful for making covers or protecting caps whereas engaged on uncovered areas.
Staying organized and affected person made the method smoother, even when issues turned overwhelming. Errors did occur, however studying from them helped with future initiatives.
Cleansing and Restoration Steps
Intensive Washing Strategies
To begin, each additional half was faraway from the bike, leaving simply the body and important items. This allow them to see all of the areas that wanted consideration. They cleaned every part rigorously, specializing in wires, connectors, and elements that had built-up dust or grime from sitting unused. For cussed areas, brushes and gentle cleaners had been used.
Small covers had been made utilizing a 3D printer to cease particles from falling into the engine whereas cleansing.
Tip: Maintaining all eliminated elements organized helped later when sure bolts or mounts had been wanted once more.
Refinishing and Portray Elements
A giant a part of making the BMW K100 look good once more was portray its elements. After a deep clear, key items—just like the body and tank—had been painted to carry them again to life. This was not only for appears but in addition to assist defend elements from rust or extra put on.
It was essential that every one elements had been free from oil and residue earlier than portray. This made certain the brand new paint caught nicely and lasted. Every half was checked after portray to ensure the end was even and coated every part.
| Step | Activity |
|---|---|
| Cleansing | Eradicating grime and outdated residue |
| Prepping | Guaranteeing elements are dry/clear |
| Portray | Making use of even, protecting coats |
| Ultimate Verify | Inspecting painted surfaces |
Working with Liquid-Cooled Motors
Adjusting to New Procedures
Studying to work on a motor that makes use of water for cooling may be completely different, particularly for these with expertise solely on air-cooled fashions. Errors are frequent at first. For instance, the radiator would possibly must be stuffed and refilled a number of occasions earlier than getting it precisely proper. Every step in taking good care of the cooling system might require endurance, trial, and error.
Some challenges embody:
- Understanding how the cooling system connects all through the bike
- Realizing when and the right way to refill coolant correctly
- Expecting leaks or missed steps after service
Getting used to those steps takes apply, nevertheless it turns into simpler over time.
Maintaining the Radiator in Good Situation
The radiator wants common consideration to maintain the engine from overheating. Right here are some things price remembering:
1. Coolant Checks:
Verify the coolant degree after engaged on the engine and after each refill. Be sure that all connections are tight and there are not any leaks.
2. Refilling Ideas:
It’d take a number of refills earlier than air bubbles filter out of the system. It’s best to examine the radiator cap and hoses after the BMW K100 has been began and run for a short while.
3. Indicators to Watch:
If the BMW K100 is working too scorching or the radiator is dropping coolant, return and examine for free hoses or missed steps.
A easy guidelines for radiator care:
| Activity | When to Do It |
|---|---|
| Verify coolant | After every refill |
| Examine hoses | After engaged on bike |
| Search for leaks | Earlier than each trip |
By following these steps, they will make sure that the engine stays cool and works nicely each time.
Body Modifications and Welding Work
Getting Welding Help
When it got here time to vary the again a part of the body, they loaded up the BMW K100 and introduced it to a good friend named Chris, who had welding expertise. Having somebody with the proper abilities was key as a result of the body wanted essential work. Chris dealt with the welding jobs, like rebuilding the rear part, so the remainder of the venture might transfer ahead. Asking for assist with welding made certain the job was accomplished proper and safely.
Why getting welding assist issues:
- Correct instruments and security gear are required
- Skilled welders could make sturdy, neat joints
- Saves time in comparison with studying from scratch
Leveling the Gasoline Tank
Balancing the gasoline tank was one other step that wanted consideration. On this particular BMW K100, the tank needed to look even and sit flat on the body. With assist from Chris, they had been in a position to line up the tank so it didn’t look misplaced. Making the tank match nicely improved the entire look of the construct.
They took additional time to examine that the tank sat degree earlier than locking it in place. This made a giant distinction within the bike’s look and gave it a completed, customized look.
| Activity | Purpose |
|---|---|
| Stability fuel tank | Ensures a clear, straight look |
| Alter mounting | Prevents awkward slant |
| Verify alignment | Improves remaining look |
Part Dealing with Strategies
Maintaining and Reusing Motorbike Elements
You will need to maintain each half that comes off the BMW K100 till the construct is completed. Even gadgets that appear pointless, like fairings or outdated bolts, usually have hidden worth. For instance, mounting brackets or fasteners from older elements can be utilized in surprising methods through the venture.
Here’s a listing of causes to maintain elements:
Maintaining elements till the venture is completed helps keep away from losing time and cash later.
Utilizing Customized Printed Options
Working with a 3D printer makes it attainable to create customized covers and small items through the construct. For instance, customized caps can defend the engine whereas working or cleansing. That is helpful when unique elements are lacking or when distinctive options are wanted.
Advantages of 3D printed bike elements:
| Purpose | Instance |
|---|---|
| Customized match | Caps to cowl engine openings |
| Fast substitute | Lacking or damaged small items |
| Price-effective | No want to purchase manufacturing facility elements |
Utilizing 3D-printed gadgets can resolve issues rapidly and provides extra management over the ultimate look of the venture.
Necessary Classes and Steering
Useful Hints for New Tasks
- Strip the BMW K100 right down to a naked body to get a transparent view for planning.
- Preserve each half till the construct is completed, even elements that appear unneeded. Mounting brackets and bolts from eliminated items may be helpful.
- Cleansing and portray elements takes time. Be ready for lots of labor on this step.
- If attainable, discover somebody with a 3D printer to make custom covers or small elements.
- Save your self bother: Take photos as you dismantle to recollect the place every part goes.
| Activity | Tip |
|---|---|
| Wiring | Depart additional size on wire ends |
| Cleansing | Put aside extra time |
| Disassembly | Retailer and label all eliminated elements |
Frequent Errors to Watch For
- Deleting helpful options by mistake, like heated grips, may be regrettable later.
- Slicing wires too near the connector could make rewiring powerful.
- Underestimating how a lot wiring is within the BMW K100 can create complications.
- Forgetting to winterize or put together for seasonal adjustments may cause issues.
- Not being cautious with gas techniques and outdated elements might lead to points, like gummed-up pumps or unintentional hearth.
Key recommendation: Take your time, double examine earlier than eradicating or tossing something, and don’t rush the planning. Errors like reducing the incorrect wire or taking off wanted elements can gradual progress and create additional work.
Trending Merchandise