The mission started with a easy thought: take an previous 1981 Suzuki GS250 and provides it a brand new life. The bike was removed from excellent, with engine noise and worn components that wanted severe consideration. What began in a small transport container workshop quickly grew into a bigger area, giving room to develop the imaginative and prescient and push the construct additional.
Step-by-step, the bike was stripped down, inspected, and rebuilt with care. From restoring the engine and upgrading the body to customized particulars just like the seat, exhaust, and final paintwork, every stage added to the transformation. The method was not solely about fixing a machine but additionally about creating one thing lasting and private.
Key Takeaways
- The construct started with a whole teardown and inspection.
- Cautious upgrades and custom work formed the bike’s new id.
- The ultimate consequence mirrored each technical talent and private dedication.
Mission Overview
Rebuilding the 1981 Suzuki GS250
The mission started with a worn 1981 Suzuki GS250 that struggled to run easily. After checking valve clearances and adjusting the chain tensioner, the engine nonetheless made harsh noises. This led to a full teardown, with the engine eliminated and the body stripped for modification.
The transfer from a small container workshop to a bigger, everlasting area supplied room to develop the construct. Components have been despatched for powder coating, and even the bolts have been zinc plated for a cleaner end. A spare operating engine was bought, cleaned, and ready to hurry up progress whereas the unique motor awaited restore.
Key upgrades included:
- Powder coated body and mounts
- Customized stainless-steel exhaust
- Rebuilt carburetors
- Contemporary wiring setup
- Handmade seat with skilled upholstery
Every step centered on each perform and element, guaranteeing the bike appeared sharp whereas performing higher than earlier than.
Objective and Path
The construct aimed to take a modest commuter bike and switch it into one thing extra succesful and private. The method was not about shortcuts however about placing effort into each half, from sprucing {hardware} to fabricating customized items.
The imaginative and prescient centered on:
- Making a dependable and distinctive experience
- Mixing basic type with custom craftsmanship
- Constructing a machine that displays dedication and endurance
By cautious work and regular progress, the bike advanced right into a mission that carried each mechanical enchancment and private which means.
Early Analysis

First Look
The bike didn’t sound wholesome when first began. The engine noise was tough and uneven, making it clear that one thing inside wanted consideration. The vendor had talked about attainable points with the cam chain or valve clearances, so these areas grew to become the primary checks.
A fast inspection led to changes on the valve clearances and a rebuild of the chain tensioner. Even after these steps, the engine nonetheless produced harsh sounds. At that time, eradicating the engine grew to become the subsequent logical step.
Checking Engine Issues
As soon as the engine got here out, a more in-depth inspection revealed a deeper subject. The noise pointed to a spun crank bearing, which defined the fixed tapping sound.
To maintain progress shifting, he introduced in a spare operating engine. Though it wanted cleansing, it supplied a sooner method to proceed the construct whereas the unique engine awaited restore.
Key checks accomplished:
- Valve clearance adjustment
- Chain tensioner rebuild
- Full engine removal
- Identification of crank bearing harm
This course of confirmed that the engine required greater than easy changes, setting the stage for a whole rebuild.
Workshop Development
Beginning Out in a Container
He started the mission inside a 30-foot transport container that served as his first workshop. Area was restricted, however it supplied sufficient room to tug the previous Suzuki GS250 aside and examine its points. Early duties included checking valve clearances, rebuilding the chain tensioner, and ultimately eradicating the engine for a more in-depth look.
A easy setup like this required profiting from each inch. Instruments, components, and the bike itself needed to be organized fastidiously. Regardless of the tight space, the container allowed him to strip the bike totally and put together the body for powder coating.
Key steps on this stage:
- Inspected and adjusted valve clearances
- Rebuilt chain tensioner
- Pulled the engine for deeper inspection
- Stripped body and ready components for coating
Shifting Right into a Greater Workshop
After the preliminary teardown, he shifted from the container right into a larger space that he nonetheless calls his dream workshop. The transfer gave him the liberty to develop his instruments, unfold out components, and work extra effectively.
The brand new area allowed for extra advanced tasks, together with rebuilding the engine, zinc-plating nuts and bolts, and fabricating a custom stainless steel exhaust. The bigger workshop additionally made it simpler to deal with upholstery, wiring, and bodywork with out feeling restricted.
| Previous Setup | New Setup |
|---|---|
| 30-foot container | Spacious workshop |
| Restricted storage | Room for growth |
| Tight work space | Organized structure |
| Fundamental instruments | Superior fabrication |
This transition marked a turning level within the construct, giving him the atmosphere wanted to push the mission from a easy restoration right into a customized creation.
Taking the Bike Aside
Breaking Down the Components
He eliminated the engine first to get a more in-depth take a look at the issues inside. After pulling it out, he shifted the mission into a bigger workshop with more room to work. From there, he stripped the remainder of the bike down piece by piece till solely the naked body remained.
Principal steps included:
- Checking valve clearances
- Rebuilding the chain tensioner
- Pulling the engine from the body
- Dismantling all remaining components for body work
Getting Prepared for Coating
With the body cleared, each half was prepped for powder coating. The body, brackets, and different parts have been despatched off to be coated, whereas the nuts and bolts have been zinc plated for a cleaner end.
| Half | Course of | Consequence |
|---|---|---|
| Body | Powder coating | Easy, sturdy end |
| Brackets | Powder coating | Even protecting layer |
| Nuts & Bolts | Zinc plating | Contemporary, corrosion-resistant look |
As soon as the coated components returned, they confirmed a pointy, uniform end that set the stage for the rebuild.
Engine Overhaul
Discovering Engine Points
The engine produced a harsh metallic noise that steered deeper issues. After checking valve clearances and rebuilding the chain tensioner, the sound remained. Eradicating the engine allowed nearer inspection, which revealed a failed crank bearing.
Key checks carried out:
- Valve clearance adjustment
- Cam chain tensioner rebuild
- Full engine removing for inspection
Changing the Crank Bearing
The noise traced again to a spun crank bearing. This required disassembly and preparation for alternative. Whereas this step paused till different components returned from powder coating, the plan centered on restoring clean rotation and eliminating the tapping sound.
Focus areas:
- Bearing alternative
- Inside cleansing
- Stopping future put on
Rebuilding and Utilizing a Spare Engine
To maintain progress shifting, a spare operating engine was introduced in. It acquired a radical cleansing and was fitted into the body whereas the unique motor awaited restore. The carburetors have been additionally rebuilt to match the recent set up.
Steps taken:
- Cleaned and detailed spare engine
- Protected body earlier than becoming
- Rebuilt carburetors for correct perform
This method allowed regular progress whereas nonetheless planning a full rebuild of the unique engine.
Body and Components Refinements
Sturdy Powder End
The body and key components have been stripped down and despatched out for a troublesome powder finish. This course of gave the steel a clean, even coat that not solely appears clear but additionally protects towards put on.
Advantages of the powder end:
- Stronger resistance to scratches
- Lengthy-lasting floor safety
- Uniform coloration and texture
A headlight bracket additionally acquired the identical therapy, retaining the look constant throughout the construct.
Handled Fasteners with Zinc
All nuts, bolts, and small fittings have been handled with a zinc layer. This step improved each the looks and the sturdiness of the {hardware}.
Why zinc therapy was used:
- Helps forestall rust
- Extends the lifetime of the {hardware}
- Provides a shiny, polished look
| Element | Improve Utilized | Objective |
|---|---|---|
| Body & brackets | Powder end | Safety + clear look |
| Nuts & bolts | Zinc therapy | Rust resistance + shine |
Customized Fabrication
Headlamp Bracket Construct
He formed and fitted a brand new mount to safe the headlamp in place. The piece was designed to match the up to date body and preserve a clear take a look at the entrance of the bike.
- Materials: Metal, later powder coated
- Objective: Maintain the headlamp securely whereas mixing with the body
- End: Powder coating for sturdiness and magnificence
As soon as coated, the bracket added each energy and a refined look to the construct.
Handmade Stainless Exhaust
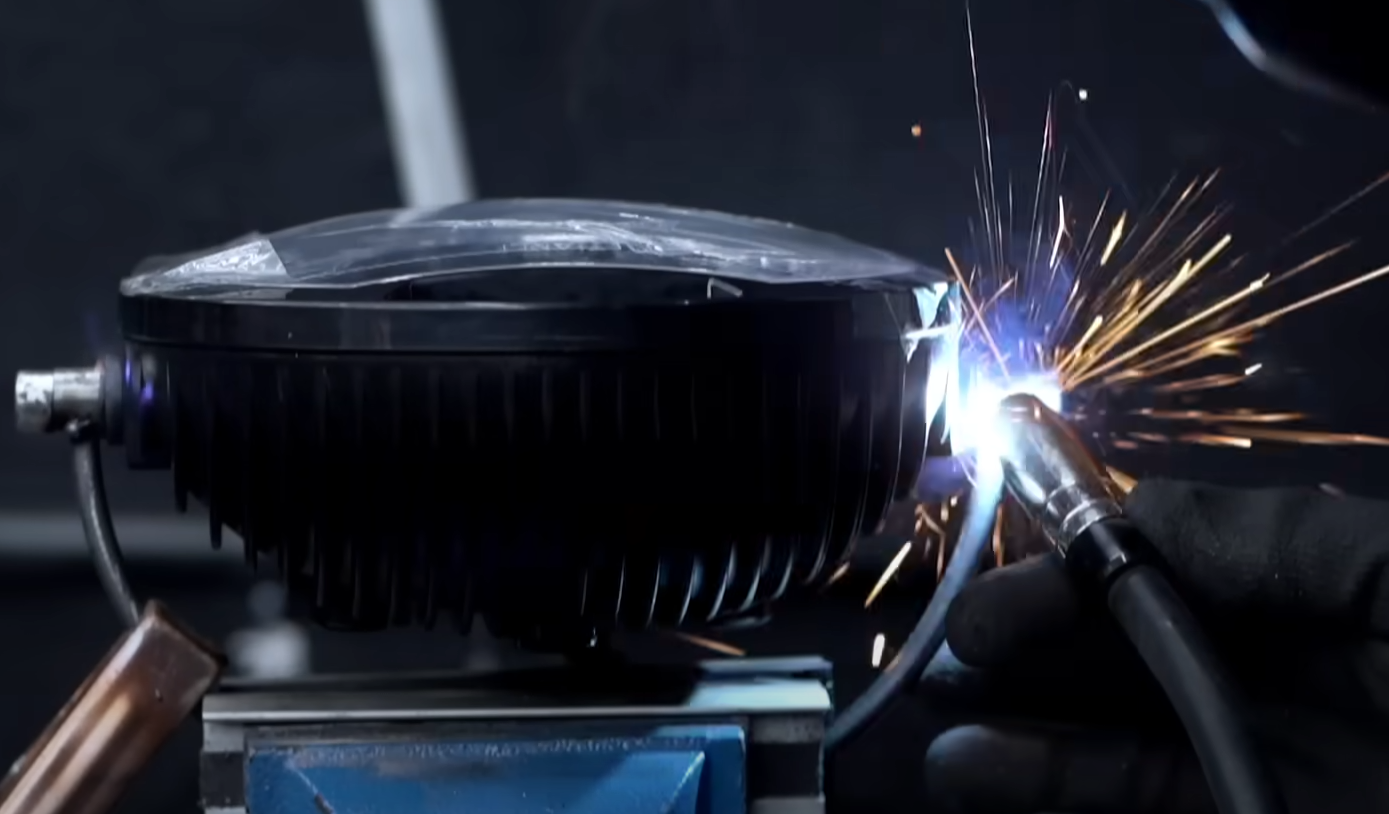
He selected to construct his personal exhaust system as a substitute of shopping for an ordinary one. Utilizing stainless steel, he lower, formed, and welded every part to create a novel circulation.
Course of steps included:
- Slicing and shaping the pipe sections
- Tack welding items collectively for check match
- Totally welding and smoothing joints
- Ultimate cleanup for a clear end
The consequence was a system that not solely match the bike’s design but additionally produced a pointy, clear sound. For a self-taught welder, the end result balanced each perform and magnificence.
Detailing and Meeting
Becoming the Motor
The freshly cleaned alternative motor went in after defending the body from scratches. Cautious alignment made the method clean, and the zinc-plated bolts gave the entire setup a clear, uniform look. With the motor seated, the construct began to resemble a whole bike once more.
Steps taken:
- Protected the body with padding
- Positioned the motor with regular help
- Secured with newly plated {hardware}
Carb Overhaul
Each carburetors acquired a full teardown and rebuild. Each jet, seal, and passage was cleaned earlier than reassembly. The consequence was a a lot sharper look and improved situation inside and outside.
Key duties:
- Eliminated and disassembled every carb
- Cleaned inside components totally
- Changed worn seals and gaskets
- Reassembled with care for correct match
| Half | Motion Taken | Situation After |
|---|---|---|
| Jets | Cleaned totally | Clear and open |
| Seals & Gaskets | Changed | Like new |
| Casings | Scrubbed & polished | Contemporary end |
Wiring and Energy Setup
The wiring harness was accomplished after the carburetor work. Connections have been checked to make sure reliability, with consideration to routing for a neat end. As soon as {the electrical} system was in place, the bike was prepared for the customized stainless exhaust to be added.
Guidelines:
- Routed wires cleanly alongside the body
- Secured connections with correct fittings
- Examined circuits earlier than shifting ahead
Seat and Upholstery
Structure and Sample Work
He started by shaping a base for the seat and making a template to information the design. The template allowed him to verify proportions and make sure the seat would match the body accurately. Utilizing this technique gave a transparent define for the upholsterer to observe and diminished the prospect of errors later.
Steps taken:
- Reduce and formed the seat base
- Marked and refined the sample
- Checked alignment with the body
This course of gave him confidence that the ultimate seat would match the type of the construct.
Expert Upholstery Work
As soon as the template was prepared, he handed it over to a professional upholsterer. The upholsterer translated the sample right into a completed seat that matched the imaginative and prescient for the bike.
Outcomes:
- Clear stitching
- Tight, clean match over the bottom
- A glance that tied in with the remainder of the construct
The collaboration between cautious planning {and professional} talent produced a seat that was each practical and visually balanced.
Bodywork and Paint
Floor Preparation
The body and components have been stripped down utterly earlier than being despatched off for powder coating. Each element, together with nuts and bolts, acquired fresh finishes to make sure sturdiness and a clear look. Defending the body throughout meeting grew to become a precedence so the brand new coating stayed intact.
Steps taken included:
- Full disassembly of the bike
- Powder coating of body and mounts
- Zinc plating of {hardware} for added safety
- Cautious dealing with throughout reassembly to keep away from harm
Paint Alternative
Selecting the best end was handled as a crucial step because the coloration would outline the general character of the construct. The choice carried weight as a result of the paint scheme may both elevate the mission or take away from the work already carried out.
Key factors thought of:
- The paint wanted to enhance the recent powder coating
- The end needed to match the custom details, together with the seat and exhaust
- The ultimate color choice aimed to steadiness type with sturdiness
Ultimate Unveiling and Ideas
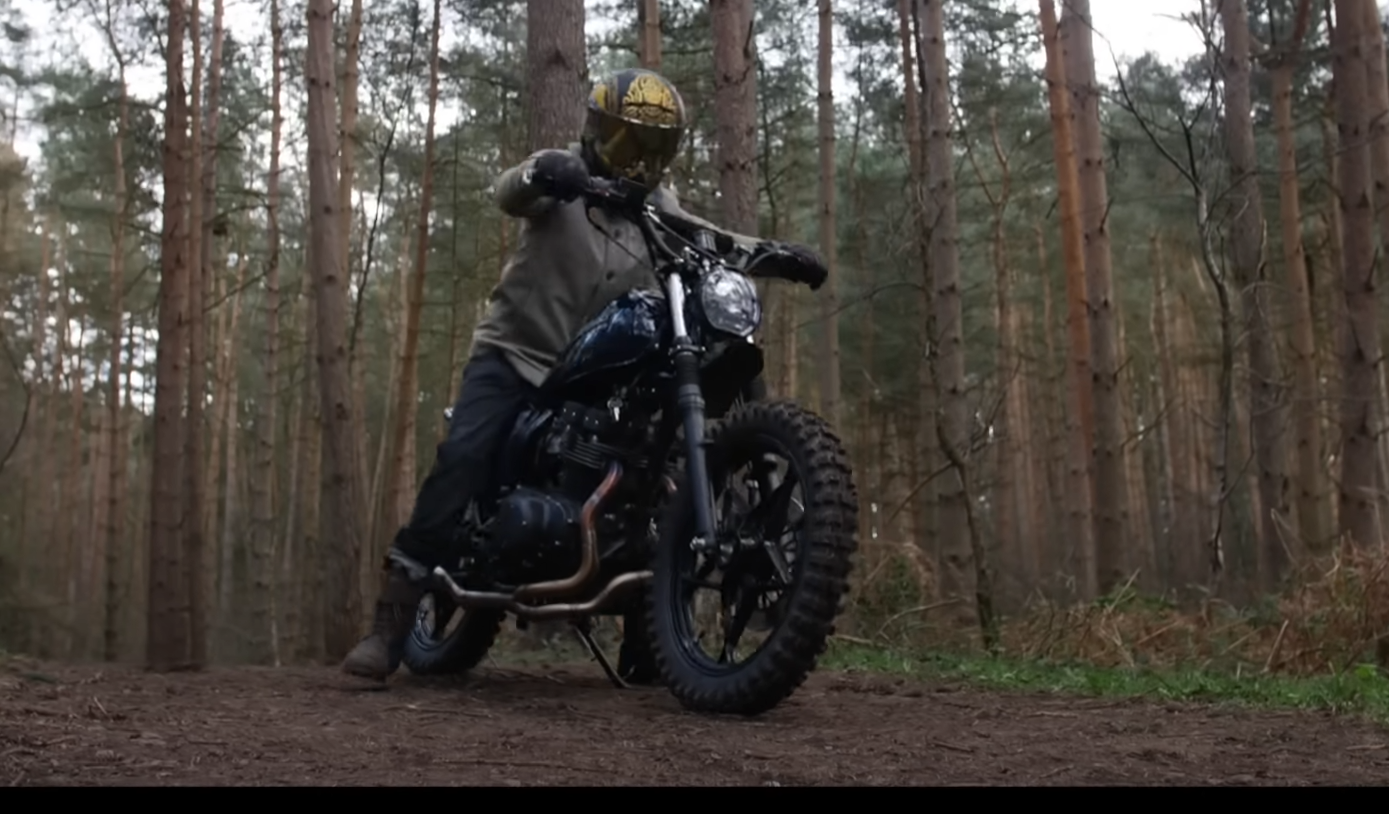
Mission Completion
The construct reached its final form after months of regular progress. Each element, from the powder-coated body to the customized stainless exhaust, got here along with care. The bike now carries a clear rebuilt engine, refreshed carbs, and wiring that ties the whole machine collectively. Even the seat, formed and upholstered to suit the body, displays the eye given to every step.
Key ending touches included:
- Powder-coated body and mounts
- Zinc-plated nuts and bolts
- Upholstered customized seat
- Rebuilt and cleaned engine
- Hand-made stainless exhaust
Private Takeaways
The method grew to become extra than simply mechanical work. It supplied a method to focus throughout unsure instances and supplied a way of goal. Every stage, whether or not stripping down the bike or fabricating new components, bolstered the concept effort and patience form the end result.
Easy classes discovered:
- Small particulars matter as a lot as massive modifications
- A clear workspace helps progress
- Constructing is as a lot about mindset as talent
Assist From Others
The mission additionally grew with the encouragement of a wider group. Viewers and supporters adopted alongside, giving suggestions and motivation. Patrons supplied direct assist that allowed the work to proceed and enhance.
| Kind of Assist | Impression |
|---|---|
| Viewers | Encouragement and suggestions |
| Patrons | Monetary assist for instruments and components |
| Neighborhood | Shared curiosity and motivation |
Trending Merchandise