Restoring an previous Honda CB750 into a restaurant racer takes persistence, planning, and a very good understanding of motorbike mechanics. The bike on the coronary heart of this challenge, courting again to the late 70s or early 80s, was partly disassembled and wanted consideration to its carburetor, wiring, and gas system earlier than any main customizations may occur.
The method started with fundamental troubleshooting and getting ready the primary elements, just like the battery, carburetor, and wiring. Every step, from becoming new gaskets to fixing small leaks within the gas tank, helped the workforce transfer nearer to turning this traditional bike into a singular cafe racer. The progress contains modifications to the seat, body, handlebars, and planning the exhaust system to match the proprietor’s imaginative and prescient.
Key Takeaways
- Cautious evaluation and setup are important for restoring and customizing a bike.
- Modifications to the bike’s physique and controls give it a singular cafe racer style.
- Addressing electrical, gas, and exhaust points ensures protected and dependable efficiency.
Motorbike Construct Plan and Foremost Targets
Historical past and Options of the Honda CB750
The bike for this construct is a Honda CB750 from the late Seventies or early Nineteen Eighties. It has a 750cc engine and sits between a road and sport bike in type. The present proprietor, Reggie, bought it over two years in the past and began some repairs. He eliminated the carburetors, changed the gaskets, and rebuilt the carbs, however didn’t reinstall them resulting from challenges with previous rubber gaskets between the cylinder head and carbs.
Some vital work has included:
- Putting in new, numbered rubber gaskets for correct carburetor alignment
- Addressing electrical issues, together with battery charging and wiring repairs
- Fixing minor leaks and points with the gas tank and gas supply system
- Utilizing a spare gas tank for testing and upkeep
The CB750 makes use of a built-in generator as a substitute of a typical alternator, and a few connectors could put on out over time. The electronics and battery mounting are being fastidiously checked and up to date as wanted.
Proprietor’s Plan for the Cafe Racer Look
Reggie desires this Honda CB750 remodeled right into a cafe racer with a singular and private type. Elements bought for this challenge embrace a cafe racer seat, a single spherical headlight, and clamp-on handlebars for a decrease, extra aggressive look. Some gadgets, just like the rear seat and handlebars, are tailored from different bikes for a customized match.
Distinctive customizations are in progress:
- A two-flag painted fuel tank (U.S. and Brazilian flags displayed, with a flag-like sample on prime)
- A bracket to safe the cafe racer seat tightly to the body and tank
- A fabricated rear part to complete the again finish of the bike
- Plans for a low, reversed handlebar setup to additional improve the cafe racer look
The construct is finished with a sensible, budget-minded strategy, utilizing accessible elements and custom fabrication the place wanted. The intention is to create a running cafe racer that captures Reggie’s private type with out extreme price.
Checkup and Undertaking Planning
Reviewing the Battery and Electrical Connections
To start out, the battery was examined. Despite the fact that it was a few years previous, it nonetheless held a cost of 11.5 volts. A charger was used to spice up it additional, ensuring the battery may nonetheless be helpful for testing. When linked, the important thing was turned to examine if electrical energy flowed to the bike.
A detailed take a look at the wires confirmed some have been reduce and never hooked up. These included connections probably going to the starter relay. Energy was examined by making an attempt to crank the engine, and though the solenoid clicked, the starter wanted extra consideration. There was additionally further area across the put in battery, signaling it in all probability was not the precise match for the bike.
Frequent electrical bother spots just like the connectors close to the engine, which may dry out or crack with age, have been inspected. The built-in generator and its linking wires have been checked. Since some connections have been unsure, trying to find a wiring diagram on-line and probably utilizing the bike’s VIN to substantiate the right battery and electrical setup was thought of.
| Step | Particulars |
|---|---|
| Battery Voltage Test | Measured at 11.5 volts, charged additional |
| Connection Check | Turned key, checked for energy |
| Visible Inspection | Famous reduce wires and doable mismatches |
| Solenoid Check | Tried cranking, heard relay click on |
| Battery Match | Noticed that present battery didn’t match snugly |
| Connector Situation | Checked for dried or weak rubber connectors |
Discovering and Gathering Wanted Parts
Earlier than going additional, the suitable rubber seals for the carburetors have been put in place. Every seal was labeled with its matching cylinder, and care was taken to align them so as. A listing of recent and spare parts included recent carburetor gaskets, a set of handlebars, a particular seat, a single headlight, and mounting {hardware}—most purchased on-line.
Different elements have been checked and gathered, like a spare gas tank from one other challenge. The carburetor setup wanted cautious examination to verify the gas line matched the gas tank’s valve, which is positioned on the left, for easy hose routing.
- Elements to Test and Put together
- New rubber gaskets for carburetors
- Spare or customized gas tank
- Cafe-style seat and mounting brackets
- Low-profile handlebars
- Wiring elements and starter relay
- Headlight and rear body items
If elements didn’t match or have been lacking, workarounds have been deliberate, reminiscent of constructing customized brackets or wanting up half numbers utilizing the VIN. On-line sources have been used to supply or crosscheck wanted gadgets earlier than set up.
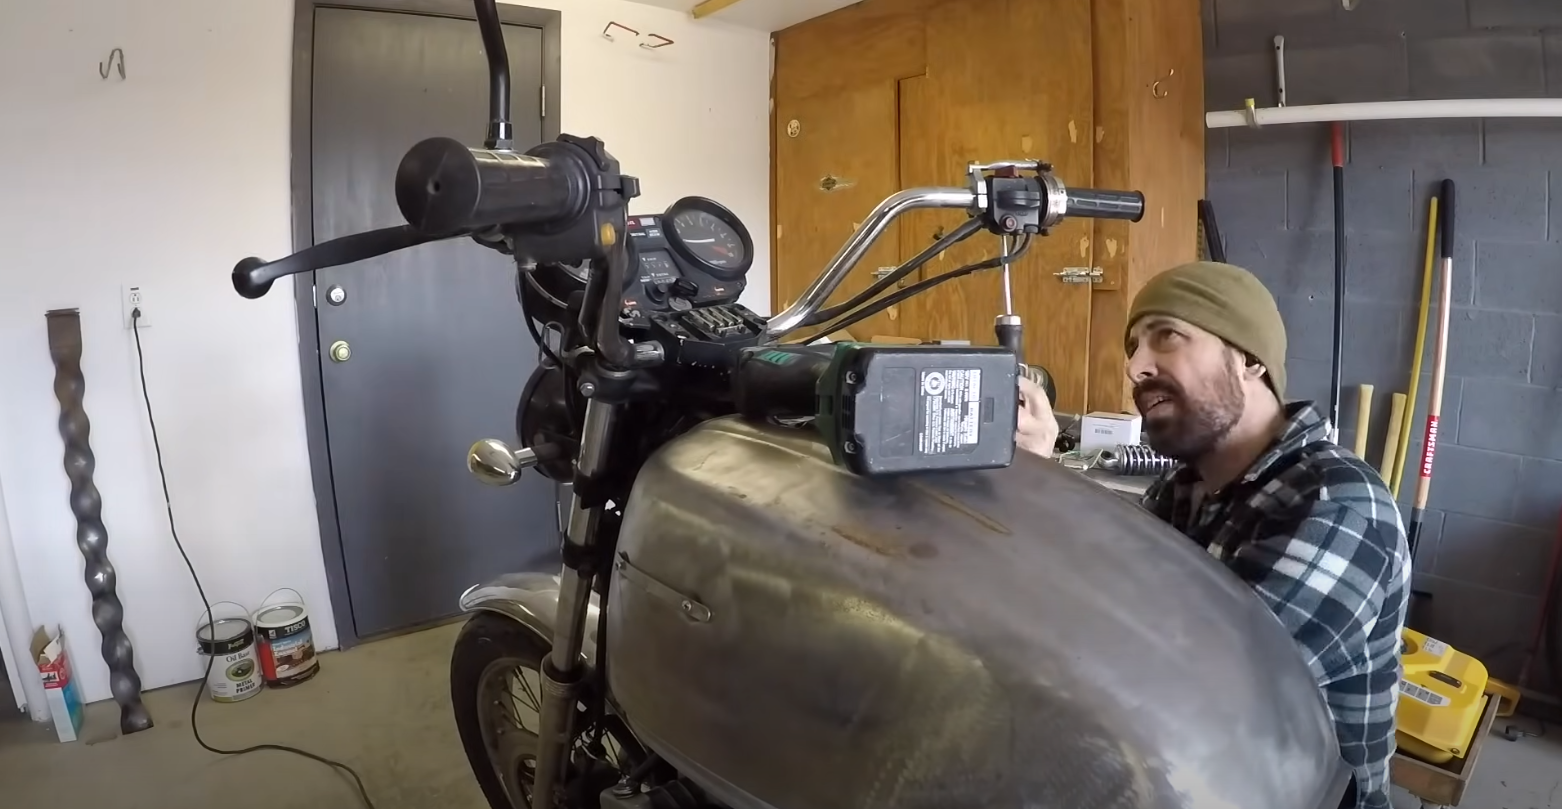
Restoring the Carburetor and Gas Supply System

Changing Broken Rubber Seals
The rubber seals that sit between the cylinder head and carburetors could be difficult. On this construct, new ones labeled 1 to 4 have been put in, ensuring the numbers confronted upward for a clear, even match. Every seal is formed a bit otherwise, so cautious matching is vital to keep away from set up points.
High-quality-Tuning and Attaching the Carburetor
Earlier than becoming the carburetor, the gas inlet place was checked. It was discovered pointing down as a substitute of aligning with the fuel tank petcock. The inlet and crossover tubes have been swapped to maneuver the fuel line greater, utilizing an current bracket for assist. This allowed the gas hose to succeed in the carb simply. As soon as swapped, the carburetor was mounted securely to the engine.
Enhancing Gas Supply and Inlet Placement
The inventory gas inlet and crossover tubes have been reconfigured so the gas line might be hooked up neatly from the tank’s left-side petcock. A spare gas tank from one other challenge was used. The petcock was fitted to let fuel circulate on to the up to date inlet, and the brand new setup ensured that each one 4 carburetors obtained gas evenly.
Recognizing and Fixing Leaks
After hooking up the spare gas tank, the gas bowls have been checked for leaks by tapping them and observing for drips. Early testing confirmed a few small leaks within the tank, traced to pinholes close to a weld. To restore these, previous sealant was eliminated, the steel was cleaned, and the spots have been welded and resealed for an enduring repair. The tank was then examined once more to verify no gas escaped, guaranteeing confidence within the rebuilt system.
Wiring and Electrical Troubleshooting
Working Round Lower and Disconnected Wires
It was clear that among the wires on the bike have been reduce, with no clear spots to attach them. A few of these wires appeared to go to a starter part, probably the primary relay for beginning. To kind this out, it helped to search for a wiring diagram on-line. This made it simpler to determine methods to bypass damaged sections and reconnect the wires appropriately.
Steps Adopted:
- Situated reduce or free wires.
- Matched wire colours to a wiring information.
- Used insulated connectors to keep away from metal-on-metal contact.
- Double-checked wires earlier than testing any energy.
Tip:
All the time use a multimeter to check for voltage earlier than transferring ahead.
Dealing With Starter and Charging System Issues
The starter solenoid confirmed some indicators of life, however didn’t absolutely flip the engine. The battery held a cost at first, however didn’t match the tray correctly and was not making the perfect contact. The bike’s energy system didn’t use a car-style alternator. As a substitute, it relied on a built-in generator, generally generally known as a stator and rotor setup.
Frequent Points Famous:
- Outdated battery now not matches proper or supplies good energy.
- Connectors close to the generator space can lose reliability if the rubber seals dry out.
- Electrical connectors can fail over time.
| Half | Downside | What Was Finished |
|---|---|---|
| Battery | Too previous, free match | Charged, examined, deliberate to exchange |
| Starter Solenoid | Clicking, no begin | Used jumper cables for direct contact |
| Generator Wiring | Getting old connectors | Inspected for indicators of wear and tear |
Tip:
If the starter solely clicks, examine each the battery life and wire connections earlier than transferring to bigger repairs.
Gas Tank Refurbishment and Set up
Checking Tank High quality and Recognizing Leaks
Earlier than putting in the gas tank, it is very important examine it for any injury or indicators of leaking. Search for rust, previous weld marks, or pinholes. If there may be any rust close to the welds or seen moist spots, these are sometimes locations the place leaks can begin.
Right here’s a easy guidelines:
| Inspection Step | What to Look For |
|---|---|
| Rust and Discoloration | Brown or reddish stains |
| Outdated Repairs | Lumpy welds, sealant flakes |
| Leaks or Damp Spots | Wetness beneath the tank |
If the tank has leaks, particularly round previous welds or seams, it needs to be mounted earlier than transferring ahead.
Fixing Leaks and Resealing the Tank
When a leak is discovered, grinding down to scrub steel creates a recent floor for welding. Small holes or weak welds have to be correctly sealed. Use a welder to connect new steel the place wanted, then reseal the realm with a fuel-resistant sealant for further safety. This makes the tank stronger and fewer more likely to leak once more.
Put on security gear when welding and permit sufficient time for any sealant to dry earlier than placing gas within the tank.
Customized Portray and Model Work
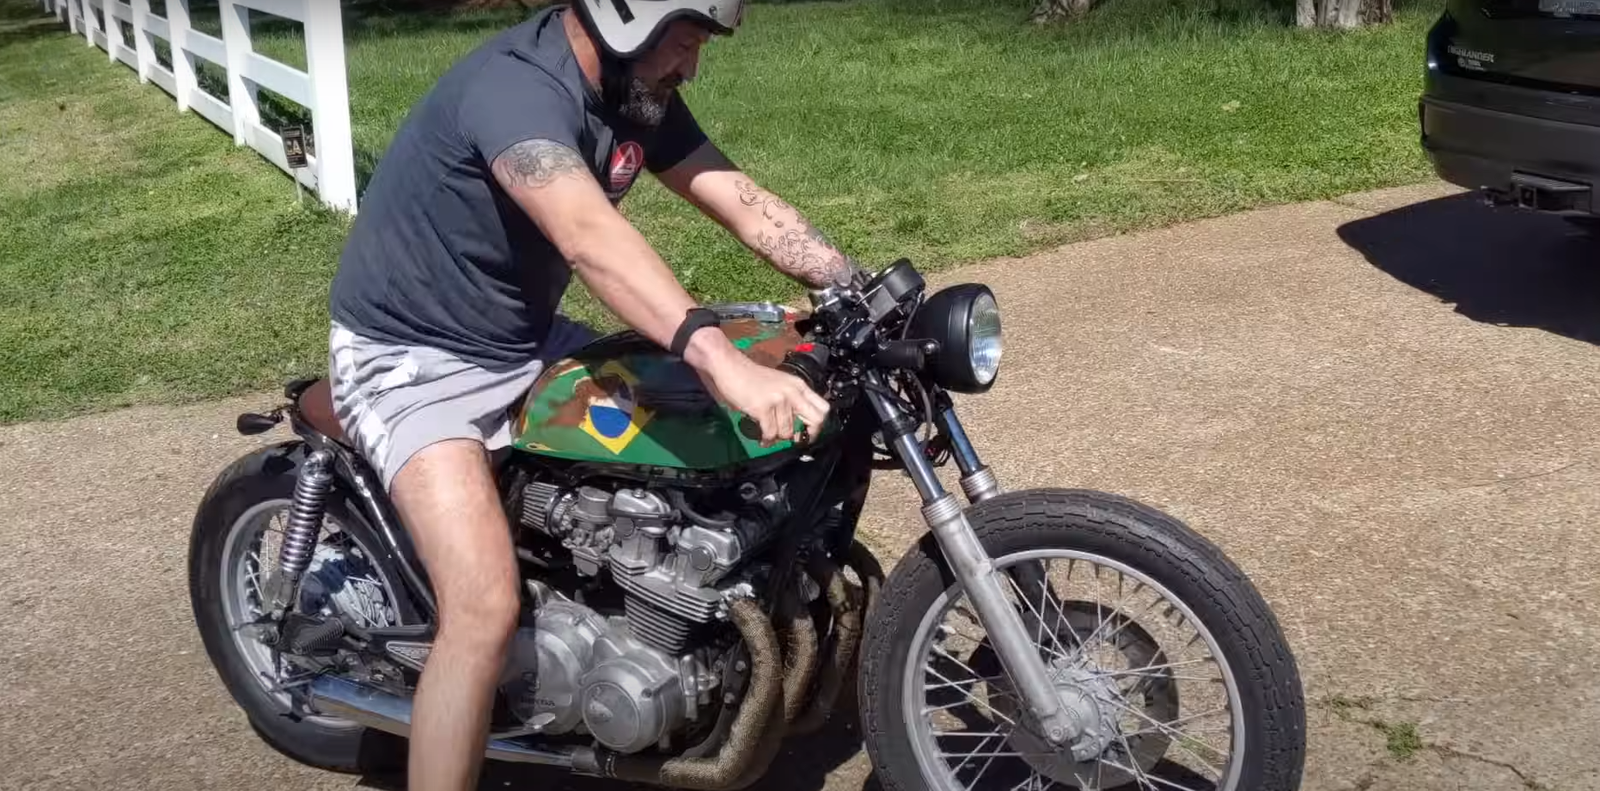
As soon as the tank is leak-free and stable, it may be painted. For this challenge, a custom paint job was chosen with the US flag on one facet and the Brazilian flag on the opposite facet. The highest additionally options colours that look much like the Mexican flag. This makes the bike extra private and highlights its unique cafe racer type.
Portray Steps:
- Clear and prep the floor.
- Apply primer and let it dry.
- Paint the customized design.
- Look ahead to the paint to treatment absolutely earlier than dealing with.
After portray, the tank was positioned on the bike to check match and line up the rear seat. Brackets have been both constructed or modified so every part lined up tightly, offering a safe match for each the tank and the seat.
Modifying the Cafe Racer Seat and Body
Putting in the Seat and Making Customized Mounts
The cafe racer seat chosen for this challenge was not made for this particular bike. Due to this, it didn’t line up with the unique mounting factors. To unravel this, a custom bracket was deliberate for the entrance of the seat. This bracket will slide beneath the prevailing fuel tank bracket and use the identical mounting bolts.
In the back of the seat, new holes should be drilled within the subframe. Bolts will probably be used to safe the rear of the seat from beneath, holding it in place. This setup retains the seat firmly hooked up and stops it from transferring round throughout using.
Elements Wanted:
- Customized entrance mounting bracket
- Bolts for rear subframe attachment
- Drill
- Wrenches
| Process | Device/Half Wanted |
|---|---|
| Make entrance seat bracket | Steel bracket |
| Drill holes in subframe | Drill, drill bits |
| Connect rear seat with bolts | Bolts, wrenches |
Shortening the Subframe and Rebuilding the Rear
The body’s again part was too lengthy for the clear look a restaurant racer wants. The plan included slicing off the tail finish of the subframe. As soon as chopped, a brand new steel assist piece will probably be welded onto the tip. This new piece stands out just a bit behind the seat, giving the bike a neat end.
Reducing the body have to be fastidiously measured earlier than marking and slicing. Welding on the brand new rear hoop takes a while, but it surely’s vital for energy and appears. The completed rear part matches the streamlined cafe racer type.
Steps for Rear Body Work:
- Mark the reduce level on the subframe behind the seat.
- Use a noticed to take away the undesirable part.
- Place the brand new assist hoop.
- Weld the ring to the subframe.
- Test that the seat and body match collectively easily.
Instruments Used:
- Marker
- Noticed or angle grinder
- Welding machine
- Measuring tape
Upgrading the Bars and Controls
Including Shorter, Smooth Handlebars
The unique handlebars have been eliminated to create a extra aggressive and streamlined look. A set of filth bike handlebars was used, however as a substitute of mounting them in the usual route, they have been flipped and put in dealing with backwards. This modification helps the bike sit decrease and offers it a sportier appearance that matches the cafe racer type.
Beneath is a comparability of handlebar types:
| Handlebar Sort | Top | Using Place | Model |
|---|---|---|---|
| Inventory/Customary | Taller | Upright | Conventional |
| Modified (Flipped) | Decrease | Leaned Ahead | Cafe Racer |
Key steps within the improve:
- The prevailing bars have been fastidiously unbolted and brought off.
- The brand new handlebars have been positioned to sit down decrease and nearer to the rider.
- This modification improves the bike’s profile and brings the controls inside straightforward attain.
These changes make the bike higher suited to tight city riding and provides it a recent, traditional look. The method is straightforward, however checking clearances and bolt tightness is vital for protected using.
Factors to Assume About for the Exhaust
Present Exhaust Setup
The bike’s exhaust system just isn’t authentic. It was reduce at one level and now has a special kind of muffler. The setup appears to be like uncommon and isn’t a manufacturing facility design. This impacts the look and the sound of the bike. The present system works, but it surely doesn’t compete with a brand new or authentic exhaust when it comes to look or high quality.
Right here’s a fast comparability:
| Inventory Exhaust | Present Setup | |
|---|---|---|
| Model | Authentic | Modified |
| Fitment | Correct | Lower and adjusted |
| High quality | Manufacturing facility-made | Makeshift |
Decrease Value Choices
Shopping for a full alternative exhaust can price about $300, which is just too costly for this sort of budget project. Due to this, extra reasonably priced selections are wanted.
Some doable options embrace:
- Utilizing the modified exhaust that’s already fitted, with small changes if wanted.
- Trying to find used or leftover elements that could be cheaper than shopping for a model new system.
- Attempting minor repairs or patching up leaks within the present exhaust so as to get monetary savings.
These choices assist hold the construct cost-friendly whereas nonetheless getting good outcomes.
Trending Merchandise